

Indoor Cannabis Growing - Your Go-To Guide
As summer winds down, it’s the perfect time to kick off your indoor cannabis grow. Shorter days make indoor setups ideal-start with strains like Pure Chocolope. Let’s get growing! We know cannabis has therapeutic and medicinal benefits, and growing it boosts well-being, whether outdoors or indoors.
Growing your own cannabis indoors from seeds lets you cultivate strains that struggle outside, like those with long flowering periods or sensitivity to temperature swings and high humidity. By mimicking the ideal climate indoors, your plants can thrive naturally.
An indoor grow room doesn’t need to be high-tech, as long as it’s safe and doesn’t bother others. The care you put into your space and equipment shines through in the end product and it all starts with good seeds. Growing at home offers many rewards.
Pros and cons of growing cannabis indoors
Indoor cultivation of Cannabis from seed has advantages but sometimes also comes with disadvantages. These depend on the space and location that you have at your disposal.
Pros of growing cannabis from seeds indoor:
- One of the advantages of growing indoors is that you can grow clean cannabis. By keeping your grow room (and the space around it) clean and well-conditioned, you keep it and the plant free from pests, fungi and diseases.
- With an indoor cultivation you have the opportunity to constantly create an ideal climate for the plant. You regulate and control everything yourself, from growth phase to flowering phase.
- Due to a short growth phase, you can grow several rounds in one year with an indoor grow. This also allows you to grow multiple varieties and always have a stock of fresh home-grown cannabis.
- You can grow varieties indoors that you can hardly grow outdoors, if at all. Cannabis strains with a long flowering period, such as sativa strains, can be left to full bloom indoors.
Cons of growing cannabis indoors:
- Improperly constructed grow installations are dangerous! Some technical knowledge is not superfluous here. Therefore, be well informed when purchasing your equipment. There are also more and more fully equipped and coordinated grow tents available with approved equipment such as lamps and extractors.
- The purchase costs are high. It is quite an investment to set up a proper grow room. As growing marijuana for personal use becomes more popular, more and more cheaper grow products that are unsatisfactory or even dangerous are coming onto the market.
- An indoor grow must be closely monitored. Light, air, water and food. All factors must be given at the right time and in the right amount.
Suzy's choice for indoor growing
-
 Pure ChocolopePure Chocolope, a Sativa-dominant strain, is a cross between OG Chocolate Thai a...€7.00
 -
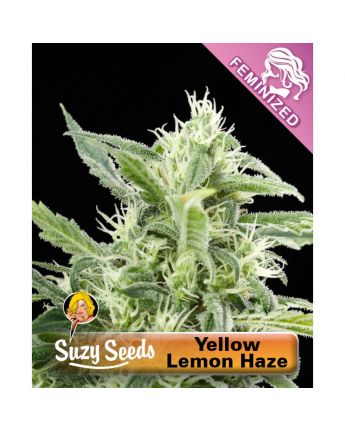 Yellow Lemon HazeYellow Lemon Haze is a cross between Lemon Skunk and Super Silver Haze, consisti...€8.00
 -
 Superior DieselThere are many stories about the origins of Diesel, but what is clear is that Su...€7.00
Your Indoor Growing Playbook
Step 1: Pick the Perfect Spot
Find a quiet corner—think a spare closet, basement, or unused garage (5x5 ft is a sweet start for 2-4 plants). Keep it discreet—lockable doors or curtains work wonders. Avoid kitchens or living rooms where heat or pets might crash the party. Good airflow and a power outlet nearby are musts—safety first!
Step 2: Set Up Your Space
Aim for a grow tent or DIY enclosure (e.g., 3x3 ft for beginners, scalable to 4x4 ft). Insulate walls with reflective mylar to bounce light—cheap and effective. Install a 4-inch exhaust fan with a carbon filter (swap it every 6 months) to ditch odors. A small oscillating fan mimics a breeze, toughening stems.
Step 3: Nail the Climate
Temp should hover 20-26°C during the day, dropping to 18-22°C at night—use a digital thermostat to track it. Humidity? 40-60% in veg, 40-50% in flower—grab a hygrometer to keep it honest. Too damp? Crack a window or add a dehumidifier. Too dry? A tray of water works magic.
Step 4: Light It Right
LEDs are the go-to—200-400W for a 4x4 ft space, cool and efficient. Hang 12-18 inches above plants, adjusting as they grow (dim for seedlings). For photoperiods, run 18/6 for veg, switch to 12/12 for flowering. Autos? Stick with 18/6 all the way—they bloom on their own in 8-10 weeks.
Step 5: Soil and Feed
Use a rich potting mix (e.g., 70% compost, 30% perlite) in 3-5 gallon pots—room for roots to stretch. Water when the top inch dries out, aiming for pH 6.0-6.5. Start with organic nutrients (NPK 10-10-10) weekly, easing off in flower. Overwatering’s a rookie trap—less is more!
Three important factors
To grow cannabis indoors from seeds, you first start with the germination, then you add water and nutrition to the soil. Temperature and humidity determine the air. And the light of your grow light would be the sun. So soil, air and light are the three important factors in indoor growing.
Soil
Soil is potting soil and the medium in which the plant grows its roots. Although there are several mediums for growing plants such as coconut, clay granules or rock wool, soil is by far the best known and gives the best results. There are various brands of potting soil on the market that are specially tailored to growing cannabis. Clean soil with the capacity to retain water well and with the right nutrition ensures healthy soil life.
Every nutritient is based on nitrogen, phosphorus and potassium (N-P-K). Check the acidity (PH) of the medium and the feed water. EC is a term that you often hear. This is the electrical conductivity that determines how much food should be administered. This is especially important in hydro-culturing. Nutrient intakes for a cannabis plant in soil are best done between PH 6 - 6.5. Preferably give organic food. There are complete food lines on the market that regulate the PH themselves. Healthy soil life promotes root growth and plant health. So give them space and grow in spacious pots.
Suzy's Tip: Never use soil from outside for indoor cultivation. You run the risk of bringing in harmful parasites, insects and diseases.
Light
There are many lighting sources that can be used when growing weed. HPS, CMH and LED are the most common.
- HPS lamp, High Pressure Sodium lamp, is the lamp on which most indoor weed is grown. This lamp has proven its worth for years. Available in 250, 400, 600 and 1000 watts. A disadvantage of these lamps is that they become very hot and, if installed incorrectly, can even pose a fire hazard because they are filled with gas. After three to four breeding rounds, the lamp needs to be replaced.
- CMH lamp, Ceramic Halide lamp. The amount of light emitted by a lamp is indicated in Lumens. The CMH lamp is still a gas-filled lamp, but with a lumen output of almost twice as much as an HPS lamp with the same wattage. To light a CMH or HPS, you need ballasts to start the lamps.
- LED lamp, Light Emitting Diode LED lamps have been on the rise in recent years. The techniques are getting better and better and nowadays achieve the same results as an HPS or CMH lamp. They are cheap, safe to use and have a long service life. They produce much less heat and do not require a separate ballast. The amount of the purchase price is what often prevents the grower.
Once a lamp has been selected, take into account the distance from the lamp to the plant. If the lamp is hung too high, there is a loss of light. If it hangs too low, there is a risk of damage to the plant due to the heat and bright light. It is recommended to use a dimmer for young plants. Keep your grow room light-tight! Make sure no light shines outside, this way you keep your grow space hidden. But it is also important that no light enters and disturbs the night's sleep of the blooming ladies, resulting in stress.
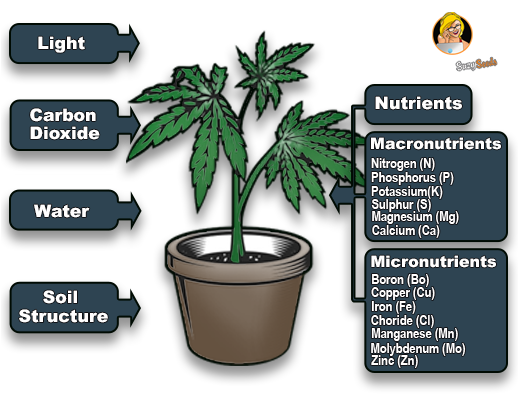 Air
Air
Depending on the heat emission of the lighting and the environment of the growing area, it is important to create an ideal temperature and humidity in the room. Fresh air is drawn in from below. The warm air is discharged from the top by an exhaust fan in the exhaust. By controlling the extraction quantity, you can regulate the temperature and humidity. Sometimes it can be useful to use an air conditioning system.
Make sure that the air drawn in is clean and that no insects can enter through the inlet. Always place a carbon filter on the exhaust side to remove the air without odor. This way you prevent nuisance and thunder.
A fan in the grow room is necessary to simulate a breeze. A small wind makes the plants strong and ensures good airflow. With a combined temperature meter-hygrometer you can check the temperature and humidity in the room. Check also our guidelines on how to build your own grow room.
Suzy’s Tip: Replace the carbon filter after three to four cultivation rounds to prevent odor nuisance
Common Beginner Mistakes:
- Overwatering: Water only when soil is slightly dry to avoid root rot.
- Light Burn: Hang lamps at a safe height to protect plants.
Pro Hacks to Steal
- Spot Check: Test your corner’s heat with a cheap thermometer first
- Air Trick: Point the fan away from buds to avoid mold.
- Light Hack: Use a timer—plants love routine!
- My Lesson: I once fried seedlings with a lamp too low—keep it safe!
Autoflower vs. Photoperiod:
Autoflowers thrive with 18/6 light, finishing in 8-10 weeks—perfect for late 2025 harvests. They need no light switch, ideal for beginners. Photoperiod strains require a 12/12 shift for flowering, offering control but needing planning. Choose based on your schedule.